AUNV-TEMPORARY-FORUM
[ main ][ links ][ about ][ help ][ discussions ][ projects ]How a clip-on night sight works.
![]()
Probably one of the most popular concepts in NODs of late is the CNVS, AKA BSNS, BNS or “PVS-22” style sight. A front-mounted clip-on night vision sight that turns a day system into a night system without compromising the Point Of Impact ( POI ) of the round that’s fired. A device that works automatically without being zero’ed and can be installed on nearly any system with or without rail.
Over the years, many people have asked me about the technology and I’ve given various answers to the question. It’s inspired a lot of people who want to make their own such device and it’s easy to understand the appeal.
Prior to clip-on NODs there were many designs to allow conversion of daytime systems to night systems. A good military scope will keep POI within 1MOA at 100m with repeated removal and remounting. That’s a circle of 2.9cm or slightly more than 1”. Indeed, that’s often good enough for most people but the constant changing of scopes and the need to switch and store them presents problems and leads to premature wear and tear as well as more practical slight changes that can cause a permanent drift in the original aim… This means that the aim needs to be reset frequently.
Additionally, scopes must be zeroed for just one rifle. You cannot simply place a NOD on whichever rifle needs it without first zeroing the device.
A BSNS ( Bore Sighted Night Sight ) has no such requirement. It can be installed straight out of the factory box onto any rifle potentially with better than 1MOA accuracy and requires no zeroing.
It fits in front of the day scope, so there is no need to lose any accuracy between night and day and it allows for magnification of the target so that aiming is easier.
But how does it do all of this?
Have you ever seen those movies where the hero defeats the villain’s cameras by placing a photograph in front of the camera? The camera moves around and looks at a virtual image instead of the real one and no one is the wiser.
Well, that’s how a Clip-on works. You create a virtual image in front of the dayscope that resembles reality and since this virtual image is real-time, you can use it to aim.
Already, several people have tried something like this with an AN/PVS-14, mounting it in front of the aiming device, however many find that the results are pretty hit and miss and by that I mean mostly miss. The reason of course is that you’re no longer aiming at a target but at a picture of a target and sometimes the picture has moved a little. It doesn’t need to move much to be out at 100m.
So what kinds of problems do you face with a clip-on device that cause this?
1. Consistent mount. ( Or lack, thereof )
As everyone knows, the first time you mount a new optic, you need to zero it. This is because the internals are not aligned with your rifle when you bolt it up. A Clip on device is no exception, except that it can’t be zero’ed and it can’t be set with a consistent fit.
As a result, any device that performs as a clip-on must be able to operate in an environment where it may be pointing in the wrong direction at times.
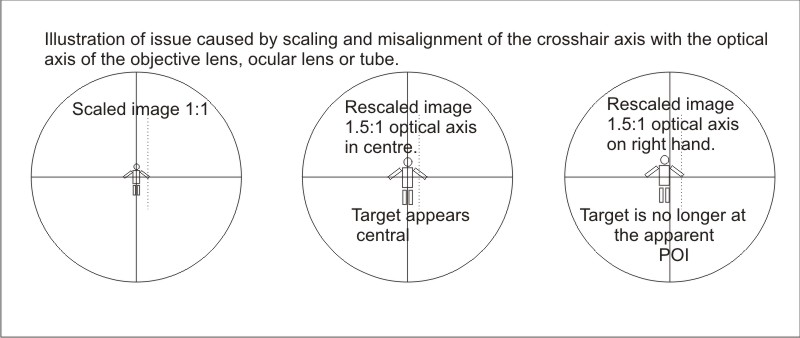
2. Equal scaling
Since you can’t align the optical axis of the dayscope with the optical axis of the night scope, you need to make sure the scale is 1:1 - that way you don’t end up with the image moving at a different rate when viewed through the dayscope.
3. Inconsistent internals.
A Night Vision scope has three sections. The Objective lens, the Tube and the Ocular lens. Each of these has a separate optical axis and these need to be aligned somehow. Otherwise your POI will be permanently displaced and this location will rotate around the tube’s primary axis.
4. Parallax
Day scopes are designed to locate the projected reticle on the same focal plane as the image. Since the image in a night vision picture is virtual and flat, it needs to be on this focal plane. Otherwise any side to side movement of the head will result in the POI shifting.
5. Distortion.
Some tubes have distortion as do some optics. To be effective, a clip-on night sight must have as little distortion as possible. This means that any linear distortion should also be correctable.
To create a successful CNVD, you need to address each of these issues or mitigate the affect of the issue. I see a lot of comments about how it’s important to get a consistent mount on a CNVD or explaining why it’s important to bolt it to a rail instead of clipping it to the scope. In truth, a good design should allow for variation here without causing failure of the device. Even a loose CNVD should be capable of maintaining a reasonable zero while moving around either due to mechanical reasons or recoil.
To explain how it works, I’ll explain how modern designs mitigate each of the above.
First, you’ll need to understand a few basics.
No matter how accurate the rail mounting is, no two rifles will aim at the same place. Placing a CNVD on any two rifles will have it pointing in a different direction. That’s given. Secondly, the optical axis of the riflescope and the optical axis of the CNVD will be separated and divergent.
As a result, the CNVD must resemble a pane of glass in front of the dayscope, reflecting the image to the dayscope exactly as it normally appears.
Magnification is the first key to a successful CNVD. The objective of a CNVD is to get the magnification as close to unity as possible. The reason this is important is because as you move away from the CNVD’s optical axis center, any magnification will cause the image to move further ( or less if negative magnification ) than the riflescope has moved in terms of degrees.
To understand this, imagine that your CNVD is 1 degree out of alignment with your daysight. If the screen is set up at unity, moving the CNVD 1 degree will also result in the screen image moving 1 degree, which corrects for the alignment mismatch.
If the CNVD has a 1.5x magnification, then moving the CNVD 1 degree will result in the image moving 1.5 degrees ( 1.5x magnification means all angles are multiplied by a factor of 1.5x )
As a result, the total shift of the image is 0.5 degrees off, but that’s per degree. If your aim point is 3 degrees from the optical center, then the effect is the POI will have moved by 4.5 degrees in total.
Those figures are large, but even if we consider real figures, the shift in POI is readily apparent. If your CNVD is 30 MOA out of alightment with your dayscope and the magnification is 1.2x ( close enough that we think it is 1x ) then the total shift from center is 16MOA or 6MOA in the other direction. This means the image shifts directly due to the magnification alone.
More, another mounting might put it 30MOA in the other direction. This means the rifle-to-rifle variation would be 12 MOA - a huge variation.
And if you think I’m still being a big large on the figures, try this. Take a dayscope from one rifle that’s sighted in and place it on another without zeroing it and see how it groups. Good luck even hitting a fridge-sized target at 50m. 1 degree is approximately 1m at 50m ( Someone please tell me if I should be saying yards ) and one degree variation between the rails and boresight of a rifle isn’t that uncommon, so at 30MOA, I’m assuming half that variation.
Given that many monoculars, especially cheaper ones, have magnifications in the 1.2x region due to lens mismatches and varying quality of optics, you can see how critical it is to get the magnification as close to 1.000x as possible.
This way, misalignment in the CNVD will also occur in the screen image and the two will cancel each other out, leading to an equal angular offset for any two rifles.
That might seem all you need. I bet a few of you, and I know you’re out there, read that and have started to think about recollimating the eyepiece or objective of your PVS-14 or whatever to get 1.0x magnification exactly so you have a poor-man’s CNVD. Good thinking, but there’s a second critical factor.
Optical alignment shift within the CNVD itself.
Just imagine if you put a mirror at 45 degrees in the optical path between your dayscope and CNVD so it was aiming sideways. Sure, the rifle-to-rifle consistency will be perfect, but your shots will all miss the target by 90 degrees! So great groups, but good luck aiming.
The problem within the CNVD is that the optical axis of the individual sections and even of the parts within them are not aligned. The objective optical axis is not aligned with the eyepiece optical axis and neither are aligned with the tube optical axis. Since the tube can twist, it can shift the alignment quite a bit and although all of these axis are very close, they aren’t perfectly aligned. Maybe not 90 degrees out, but they are out.
As a result, for a particular CNVD that had this issue, each rifle would be out by the same amount.
The solution is to allow re-alignment of the optical axis of the CNVD to bring a system alignment of the entire scope.
This isn’t too different to how a normal dayscope adjustment works. You can use Windage and Elevation adjustment to adjust the optical axis and the result is that you can bring it onto target wherever it needs to be.
It’s the same in a CNVD. You also need windage and elevation adjustment, however such mechanisms are known to move over time and with wear and tear. With external turrets it’s just a matter of a quick re-zero, but a CNVD is designed to have a service lifetime without ever needing adjustment.
As a result, the mechanism most often used is a set of risley prisms. Risley prims are two very acute prisms next to each other that can be rotated independently. Put into a CNVD, they allow realignment of the optical axis so it’s consistent through the device and more importantly, is boresighted so that the center is consistent with a rail.
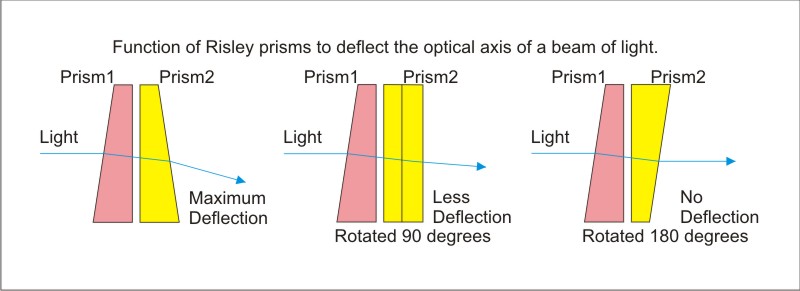
They only adjust windage and elevation in the end so are functionally no different from the turrets and movement mechanism inside a dayscope, but the narrow design is a better way to do this.
Now you have a CNVD that’s aligned so it’s boresighted with no offset of the image relative to the dayscope and because the magnification is 1:1 exactly, there’s no need to ensure that it’s pointing in the same direction as the dayscope, because the shift between the image and the screen cancels out.
The next item to consider is the parallax.
Look at an item with your dayscope that’s relative close - less than 10m and move your head from side to side. Make sure the dayscope is sitting on a table or in a vice or something so it doesn’t move and what you will notice is that the crosshairs move slightly. This is called parallax.
The problem is that the CNVD isn’t 10m away, it’s 1inch away and it’s usually lower or higher than the scope. This can lead to severe parallax since most dayscopes are designed to eliminate parallax at a particular distance - usually 40m, 100m or 150m.
As most dayscopes have parallax adjustment that’s present to around 100 to 150m, they are designed to correctly place the crosshair on the target at this range without side-to-side movement of the head causing any problems.
To address this issue, the CNVD should have it’s image appear to be located at a range of around 100m. This addresses parallax error.
The final problem to address is distortion. Distortion can be inherent in the parts ( eg, Shear or S distortion in the tube ) or in the lenses. There’s no easy way to address this, so mitigation is the best approach. Getting the optical centers as close to possible is the only way to get around this issue.
Now you have a pretty good idea of what is necessary to make a CNVS or BNS, but there’s still a few considerations.
The first is the angle of the optical system intended to be used with the CNVS. Most dayscopes have a viewing angle of around 18 degrees but at the front, after magnification, this is around 3 degrees. ( 6x magnification )
On the other hand, a typical NOD has a viewing angle of around 40 degrees.
The problem with this is that when looking at a typical NOD, you will only be using the middle 3 degrees of the image, meaning the outside 37 degrees are wasted.
Because you’re looking at such a detailed view of the screen of the NOD, the high resolution image typically around 2000 lines at best is now only about 172 lines wide. That means that the image becomes so grainy, it’s not possible to actually see a target.
Worse, this is at 3% MTF, or otherwise, only 3% of the fine detail is transmitted to the eye. That’s about the same resolution as an icon on the screen when running windows.
As a result, it’s important to concentrate the image to use more of the image intensifier. To do this, most CNVD’s use 75mm or 100mm lenses instead of the typical 25mm lens that most monoculars have.
Normally, such a large lens would give around 3x or 4x magnification, but remember that the magnification must be unity, so they also use a similar lens on the rear of the CNVD so that the total system magnification is 1:1.
The result is that instead of a typical 40 degree window, the CNVD has around a 10 degree window. This makes it too narrow to use as a monocular, but does have the advantage of increasing the apparent resolution of the image by 3x to 4x the amount compared to a normal monocular.
The downside is that such lenses are quite large normally an aside from the weight factor, there’s the length of the focal plane to consider. Large lens sizes also have longer focal plane distances, so CNVD lenses tend to be longer than monocular lenses.
You’ll probably still notice that the mismatch in field angle is 3 degrees to 10 degrees and although it would be useful to eliminate this difference and bring them closer, this would decrease the number of photons getting to the image intensifier also just like using an 8x scope would, leaving the image too dark to use. As a result, all CNVDs are a compromise, losing a significant amount of resolution to maintain the brightness of the image.
In closing, I’ll give you a fun experiment to try when you do get hold of a CNVD ( You’re not still thinking of making one are you? ) It’s best to try this at night.
Put a scope down on a table so it’s not moving and point it at something in the distance. Put the CNVD in front of it, look through the dayscope and see if the POA (point of aim) moves. Now wiggle the CNVD around slowly. Rotate it and move from side to side and see how much the POA moves.
The better the quality of the CNVD and the more effectively they mitigate the problem, the less the POA will move. It should be possible to eliminate almost all movement of the aim point in a perfect CNVD system, but in practice, you will probably find slight movement as you approach extremes.
CNVDs aren’t perfect with respect to what they need to mitigate to work effectively. They only need to be close enough so that in normal use, they keep the POI to within 1 MOA.
But this is a very good way to test CNVDs and sort out the average ones from the exceptional ones and if there are any flaws in the build or design, this test will quickly identify them
One final thing to consider - Some CNVD’s are intended for fairly large calibre rifles. These often have recoil mitigation components to allow use of tubes that otherwise could not safely handle the recoil level to which they are exposed.
And for more reading, you can look up Risley prisms. Better diagrams than mine too.
http://www.photonics.com/Article.aspx?AID=25652
Thanks for reading - As always, questions and comments are welcome.
David. ( AKA, CJ7HAWK )